多機能スライダーSwiperをカラーミーに設置する方法を解説します
Swiperは、jQuery不要の多機能なスライドショープラグインです。
今回は、多機能スライダーSwiper ver.9をカラーミーショップ![]() に設置して、動かしてみました。
に設置して、動かしてみました。
カラーミーショップ![]() に設置する際のサンプルコードを中心に解説しています。
に設置する際のサンプルコードを中心に解説しています。
Swiperの主な機能について
Swiperの使い方は別記事にまとめてあります。
ここでは詳しく解説していませんので、Swiperを初めて使う方は下記記事をご一読ください。
Swiperにはオーソドックスな機能は揃っています。
また、スライダーの種類、エフェクトの種類が多く、パラメーターなど細かい設定が可能です。
他と比べると、作り込めるスライダーとなっています。
参考)Swiper API
トップページの大スライダーとして使う
ここでは、カラーミーショップ![]() 公式テンプレート「Discover(無料版)」を例に、Swiperを設置します。
公式テンプレート「Discover(無料版)」を例に、Swiperを設置します。
カラーミーショップ![]() の管理画面(ショップ作成>デザイン>スライドショー)で登録した画像をSwiperで使うようにコードを書き換えます。
の管理画面(ショップ作成>デザイン>スライドショー)で登録した画像をSwiperで使うようにコードを書き換えます。
設置例は以下のとおりです。

Discoverのスライダー部分
テンプレート内の該当箇所はトップHTML 4-29行目です。
bxSliderというプラグインを使っているのがわかります。
Swiperに置き換えますので<script>~</script>は不要になります。
<!-- スライダー -->
<div class="u-container">
  <{if $slideshow_html}>
  <div class="slider">
    <{$slideshow_html}>
  </div>
  <script type="text/javascript">
    //<![CDATA[
    $(window).load(function () {
      $('#slider').bxSlider({
        auto: true,
        pause: 5000,
        speed: 500,
        controls: false,
        captions: true,
        pager: true,
        responsive: true,
        useCSS: false,
        mode: 'fade'
      });
    });
    //]]>
  </script>
  <{/if}>
</div>
<!-- //スライダー -->
$slideshow_htmlの中身
さて。上記のコード内に登場した独自タグ<{$slideshow_html}>には、カラーミーショップ![]() の管理画面で登録した内容が入っています。
の管理画面で登録した内容が入っています。
実際に何が入っているか確認しましょう(読みやすいように改行を入れています)。
<div class="slider">
  <link rel="stylesheet" type="text/css" href="./js/jquery.bxslider/jquery.bxslider.css">
  <script src="./js/jquery.bxslider/jquery.bxslider.min.js"></script>
  <div id="slider">
    <div>
      <a href="https://naeco.jp/product/colorme-template-02">
        <img src="https://img21.shop-pro.jp/PA01488/210/slideshow/slideshow_img_2a66f2.jpg?cmsp_timestamp=20220708134508" alt="" title="Hello!<br>Natural Living And Simple Life.">
      </a>
    </div>
    <div>
      <a href="https://naeco.jp/product/colorme-template-02">
        <img src="https://img21.shop-pro.jp/PA01488/210/slideshow/slideshow_img_70fb76.jpg?cmsp_timestamp=20220708134528" alt="" title="スライドショーを横幅いっぱいに表示するには<br>大きめの画像が必要です">
      </a>
    </div>
    <div>
      <a href="https://naeco.jp/product/colorme-template-02">
        <img src="https://img21.shop-pro.jp/PA01488/210/slideshow/slideshow_img_c214eb.jpg?cmsp_timestamp=20220708134534" alt="" title="スライドショーの横幅が広すぎる場合は<br>狭めることも可能です">
      </a>
    </div>
    <div>
      <a href="https://naeco.jp/product/colorme-template-02">
        <img src="https://img21.shop-pro.jp/PA01488/210/slideshow/slideshow_img_2509b1.jpg?cmsp_timestamp=20220708134539" alt="" title="ここの画像は横幅2637pxです">
      </a>
    </div>
  </div>
  <style>
  .bx-wrapper .bx-pager {
    padding-top: 10px;
    bottom: -20px;
  }
  .bx-wrapper {
    margin-bottom: 30px;
  }
  </style>

</div>
管理画面で登録した内容以外に、HTMLタグやCSSが付加されて出力されていることがわかります。
ただし、Swiperを動かすのに必要なクラス、swiper、swiper-wrapper、swiper-slide がたりていません。
ページネーション、ナビゲーションボタンを表示するタグ(HTML)もありません。
jQueryのメソッド(addClass、append)を使って、追加する必要があります。
大スライダーのサンプルコード
サンプルコードでは、
- CSSで、スライドのサイズを調整
- CSSで、ナビゲーションボタンとページネーションの色・サイズを変更(後述)
- HTMLで、Swiper大外のクラスを class="swiper mv"に
- jQueryで、Swiper必須のタグとクラスを挿入
- Swiperを '.mv' で初期化
<link rel="stylesheet" href="https://cdn.jsdelivr.net/npm/swiper@9/swiper-bundle.min.css"/>
<script src="https://cdn.jsdelivr.net/npm/swiper@9/swiper-bundle.min.js"></script>

<style>
.mv {
  --swiper-navigation-color: #eee; /* ナビゲーションボタンの色 */
  --swiper-pagination-color: #333; /* ページネーションアクティブ時の色 */
  --swiper-pagination-bullet-width: 12px; /* ページネーションのドットのサイズ */
  --swiper-pagination-bullet-height: 12px; /* ページネーションのドットのサイズ */
  max-width: 1600px; /* スライドの最大幅 */
}
</style>

<!-- スライダー -->
<{if $slideshow_html}>
<div class="swiper mv">
  <{$slideshow_html}>
</div>

<script>
$('#slider').addClass('swiper-wrapper');
$('#slider > div').addClass('swiper-slide');
$('.mv').append('<div class="swiper-pagination"></div>');
$('.mv').append('<div class="swiper-button-prev"></div>');
$('.mv').append('<div class="swiper-button-next"></div>');

var mySwiper = new Swiper('.mv', {
  // Optional parameters
  loop: true,
  speed: 1000,
  autoplay: {
    delay: 5000,
  },
  // If we need pagination
  pagination: {
    el: '.swiper-pagination',
    clickable: true,
  },
  // Navigation arrows
  navigation: {
    nextEl: '.swiper-button-next',
    prevEl: '.swiper-button-prev',
  },
})
</script>
<{/if}>
<!-- //スライダー -->
注意点など
Swiperの見た目は、カスタムプロパティ(CSS変数)でいじれます。
--swiper-* のような変数に値をセットすると、サイトに反映できます。
デベロッパーツールでCSSを見ると、変数名が調べられます。
「Discover(無料版)」の場合は、トップCSSの1-49行目は削除しておきましょう(あると正常動作しません)。
既存のテンプレートに設置する場合は別のスライダー用CSSが入っていて、それが原因でレイアウトが崩れることがあります。
Swiperを複数設置することがよくあります。
それぞれ区別して初期化したい場合は、別名のクラス名(またはid名)を付ける必要があります。
初期化のコードは一番最後に実行します。
キャプションを切り出す
カラーミーショップ![]() の管理画面(ショップ作成>デザイン>スライドショー)で、キャプション(=字幕)が登録できます。Swiper上でも表示することが可能ですが、切り出してタグに加工する必要があります。
の管理画面(ショップ作成>デザイン>スライドショー)で、キャプション(=字幕)が登録できます。Swiper上でも表示することが可能ですが、切り出してタグに加工する必要があります。
以下のように、キャプションはスライドのtitle属性としてセットされています。
<img src="https://img21.shop-pro.jp/PA01488/210/slideshow/slideshow_img_2a66f2.jpg?cmsp_timestamp=20220708134508" title='Hello!<br>Natural Living And Simple Life.'>Hello!<br>Natural Living And Simple Life. を切り出して、Swiperの書式にしたがって表示するコードを書きます。
サンプルコード(JavaScript)
let elImg = document.querySelectorAll('.swiper-slide img');
let elDiv = document.querySelectorAll('.swiper-slide');
for (let i = 0; i < elDiv.length; i++) {
let elNew = document.createElement('div');
elNew.innerHTML ='<div class="caption">' + elImg[i].title + '</div>';
elDiv[i].appendChild(elNew);
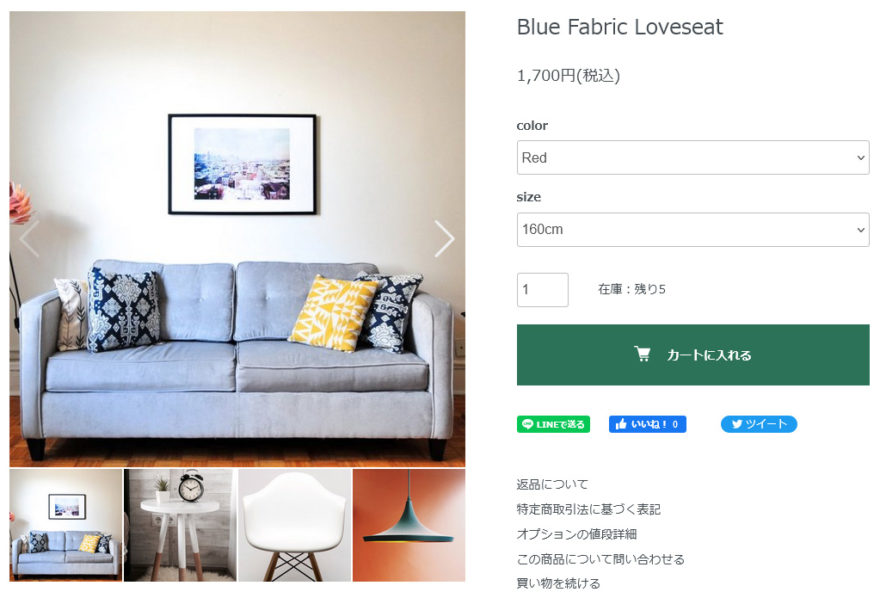
}商品詳細ページに設置する
ここでも、カラーミーショップ![]() 公式テンプレート「Discover(無料版)」を例に、Swiperを設置します。
公式テンプレート「Discover(無料版)」を例に、Swiperを設置します。
カラーミーショップ![]() の管理画面で商品登録した際の画像をSwiperで使うようにコードを書き換えます。
の管理画面で商品登録した際の画像をSwiperで使うようにコードを書き換えます。
また、サムネイル画像とメイン画像が連動する機能が必要です。
設置例は以下のとおりです。
コードの解説
Swiper公式に、サムネイルとメイン画像の連動するデモページがあります。このコードを使います。
参考)Swiper demo
サンプルコードでは、
- 2つスライダーを設置。Swiperの初期化を分けるため、main-img、thumb-imgとクラスを分ける
- 適切な要素に swiper、swiper-wrapper、swiper-slide のクラスを付ける
- メインスライダーの初期化時にthumbsパラメーターを設定
「Discover(無料版)」の商品詳細ページにはslickというスライダーが設置されています。
Swiperを入れた際に誤動作しますので削除します(商品詳細HTMLの420-455行目)。
商品詳細ページのサンプルコード
テンプレート「Discover(無料版)」の商品詳細HTMLの34-79行目を、下記コードに置き換えればOKです。
        <!-- 商品画像 -->
        <link rel="stylesheet" href="https://cdn.jsdelivr.net/npm/swiper@9/swiper-bundle.min.css"/>
        <script src="https://cdn.jsdelivr.net/npm/swiper@9/swiper-bundle.min.js"></script>

        <style>
          .main-img {
            --swiper-navigation-color: #eee; /* ナビゲーションボタンの色 */
          }
          .thumb-img {
            padding-top: 2px;
          }
        </style>

        <div class="p-product-img">
          <div class="swiper main-img">
            <div class="p-product-img__main js-images-slider swiper-wrapper">
              <div class="p-product-img__main-item swiper-slide">
                <{if $product.img_url != ""}>
                <img src="<{$product.img_url}>" alt="<{$productlist[num].name|escape:'html'}>" />
                <{else}>
                <img src="https://img.shop-pro.jp/tmpl_img/86/no-image.jpg" alt="<{$productlist[num].name|escape:'html'}>" />
                <{/if}>
              </div>
              <{if $otherimg_num != 0}>
              <{section name=num loop=$otherimg}>
                <{if $otherimg[num].url != ""}>
                <div class="p-product-img__main-item swiper-slide">
                  <img src="<{$otherimg[num].url}>" alt="<{$productlist[num].name|escape:'html'}>" />
                </div>
                <{/if}>
              <{/section}>
              <{/if}>
            </div>
            <div class="swiper-button-next"></div>
            <div class="swiper-button-prev"></div>
          </div>
          <{if $otherimg_num != 0}>
          <div class="p-product-img__thumb">
            <div class="u-overflow-slide swiper thumb-img">
              <ul class="swiper-wrapper">
                <{if $product.img_url != ""}>
                <li class="swiper-slide">
                  <div class="p-product-thumb-list__img">
                    <img src="<{$product.img_url}>" alt="<{$productlist[num].name|escape:'html'}>" />
                  </div>
                </li>
                <{/if}>
                <{section name=num loop=$otherimg}>
                  <{if $otherimg[num].url != ""}>
                  <li class="swiper-slide">
                    <div class="p-product-thumb-list__img">
                      <img src="<{$otherimg[num].url}>" alt="<{$productlist[num].name|escape:'html'}>" />
                    </div>
                  </li>
                  <{/if}>
                <{/section}>
              </ul>
            </div>
          </div>
          <{/if}>
        </div>

        <script>
        var thumbSwiper = new Swiper('.thumb-img', {
          slidesPerView: 4,
          slideToClickedSlide: true,
          spaceBetween: 2,
        });
        var mainSwiper = new Swiper('.main-img', {
          navigation: {
            nextEl: '.swiper-button-next',
            prevEl: '.swiper-button-prev',
          },
          thumbs: {
            swiper: thumbSwiper,
          },
        });
        </script>
        <!-- // 商品画像 -->
注意点など
必要に応じて、breakpoint(パラメーター)を入れて、レスポンシブ対応をします。
先にサムネイルスライダーを初期化して、次にメインスライダーを初期化します(順番が大事!)。
メイン画像のズーム
設置例は以下のとおりです。
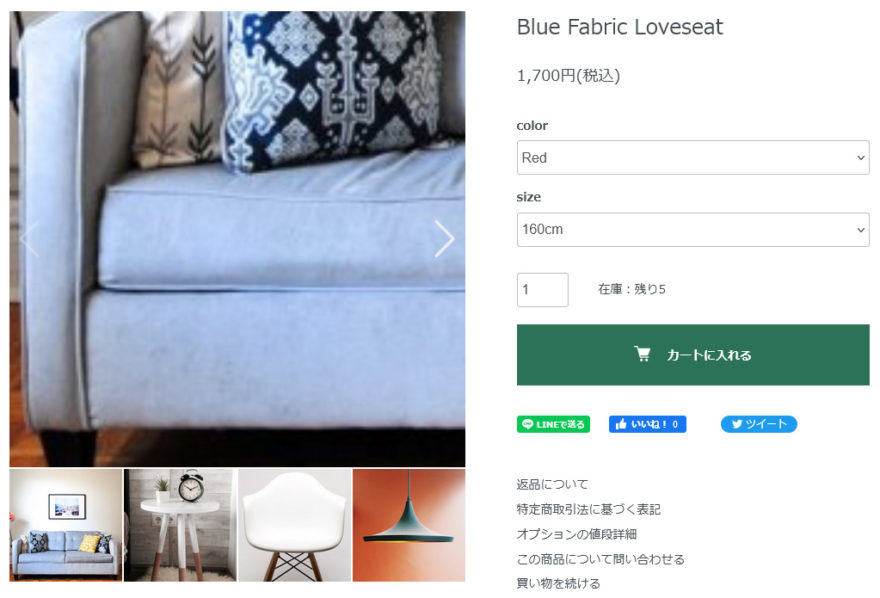
メイン画像をダブルタップ(またはダブルクリック)すると、3倍に拡大します(maxRatioで変更可能)。
また、ピンチアウト(拡大)・ピンチイン(縮小)が動作します。
コードは簡単です。
zoomパラメータをtrueで追加します。
swiper-zoom-containerクラスをつけた要素で画像を包みます。
テンプレートに元々あった p-product-img__main-itemクラスがあると崩れるので、削除します。
        <!-- 商品画像 -->
        <link rel="stylesheet" href="https://cdn.jsdelivr.net/npm/swiper@9/swiper-bundle.min.css"/>
        <script src="https://cdn.jsdelivr.net/npm/swiper@9/swiper-bundle.min.js"></script>

        <style>
          .main-img {
            --swiper-navigation-color: #eee; /* ナビゲーションボタンの色 */
          }
          .thumb-img {
            padding-top: 2px;
          }
        </style>

        <div class="p-product-img">
          <div class="swiper main-img">
            <div class="p-product-img__main js-images-slider swiper-wrapper">
              <div class="swiper-slide">
                <div class="swiper-zoom-container">
                  <{if $product.img_url != ""}>
                  <img src="<{$product.img_url}>" alt="<{$productlist[num].name|escape:'html'}>" />
                  <{else}>
                  <img src="https://img.shop-pro.jp/tmpl_img/86/no-image.jpg" alt="<{$productlist[num].name|escape:'html'}>" />
                  <{/if}>
                </div>
              </div>
              <{if $otherimg_num != 0}>
              <{section name=num loop=$otherimg}>
                <{if $otherimg[num].url != ""}>
                <div class="swiper-slide">
                  <div class="swiper-zoom-container">
                    <img src="<{$otherimg[num].url}>" alt="<{$productlist[num].name|escape:'html'}>" />
                  </div>
                </div>
                <{/if}>
              <{/section}>
              <{/if}>
            </div>
            <div class="swiper-button-next"></div>
            <div class="swiper-button-prev"></div>
          </div>
          <{if $otherimg_num != 0}>
          <div class="p-product-img__thumb">
            <div class="u-overflow-slide swiper thumb-img">
              <ul class="swiper-wrapper">
                <{if $product.img_url != ""}>
                <li class="swiper-slide">
                  <div class="p-product-thumb-list__img">
                    <img src="<{$product.img_url}>" alt="<{$productlist[num].name|escape:'html'}>" />
                  </div>
                </li>
                <{/if}>
                <{section name=num loop=$otherimg}>
                  <{if $otherimg[num].url != ""}>
                  <li class="swiper-slide">
                    <div class="p-product-thumb-list__img">
                      <img src="<{$otherimg[num].url}>" alt="<{$productlist[num].name|escape:'html'}>" />
                    </div>
                  </li>
                  <{/if}>
                <{/section}>
              </ul>
            </div>
          </div>
          <{/if}>
        </div>

        <script>
        var thumbSwiper = new Swiper('.thumb-img', {
          slidesPerView: 4,
          slideToClickedSlide: true,
          spaceBetween: 2,
        });
        var mainSwiper = new Swiper('.main-img', {
          autoHeight: true, // ないと下に隙間が空く
          zoom: true,
          navigation: {
            nextEl: '.swiper-button-next',
            prevEl: '.swiper-button-prev',
          },
          thumbs: {
            swiper: thumbSwiper,
          },
        });
        </script>
        <!-- // 商品画像 -->
おわりに
カラーミーショップ![]() を使っていても、管理画面からスライド画像を登録してSwiperを使うことができます。
を使っていても、管理画面からスライド画像を登録してSwiperを使うことができます。
画像の変更がしやすいので、独自タグを使って設置するのがおすすめです。
Swiperは、slickに比べるとスワイプしやすいので、スマートフォン時の操作感が上がります。
おまけに多機能なので、こちらを選ぶ方がよいです。
執筆者

えいじ@naeco.jp この記事を書いた人
自作するのが好きですぐに試したくなる、凝り性なWebエンジニア。
カラーミーショップ、モールなどのECについて記事にしています。
ご相談・お問い合わせはこちら